Many service providers offer webhooks as a means to integrate their service into another system. Webhooks are basically a form of callbacks which can be used to trigger functionality somewhere else. In the case of webhooks this is usually done by submitting some sort structured data like JSON into a http service. In this article we will cover how you can accept and validate JSON based webhook events using Wishbone.
Boostrapping a server
A Wishbone server is boostrapped using a YAML file.
The bootstrap file we use for this article looks like:
1 2 3 4 5 6 7 8 9 10 11 12 13 14 15 16 17 18 19 20 21 22 23 24 25 26 27 28 29 30 31 32 33 34 35 36 37 38 | --- modules: input: module: wishbone.input.httpserver decode: module: wishbone.decode.json validate: module: wishbone.function.jsonvalidate arguments: schema: /tmp/webhook_validation_schema.json invalid_json: module: wishbone.output.stdout arguments: prefix: "Invalid Data: " foreground_color: RED invalid_schema: module: wishbone.output.stdout arguments: prefix: "Failed schema validation: " foreground_color: YELLOW valid_data: module: wishbone.output.stdout arguments: prefix: "Valid data: " foreground_color: GREEN routingtable: - input.outbox -> decode.inbox - decode.outbox -> validate.inbox - decode.failed -> invalid_json.inbox - validate.outbox -> valid_data.inbox - validate.failed -> invalid_schema.inbox ... |
Starting the server in foreground can be done by issuing:
$ wishbone debug --config boostrap.yaml
Receiving data over http(s)
The module responsible for accepting incoming events over HTTP is wishbone.input.httpserver. The module is initialized on line 3 and the instance is called input. The module is initialized using its default values which is sufficient for this example. If you would like to see the available parameters to initialize the module you can do:
$ wishbone show --module wishbone.input.httpserver
The module accepts data submitted using a HTTP POST or PUT. The URL endpoint determines the module's queue the data will be submitted to.
The / endpoint is automatically mapped to the default queue outbox. Endpoints can only have a depth of 1, so http://localhost:19283/one/two would not be a valid URL to which data can be submitted.
When data is be subbmitted to http://localhost:19283/one we expect the module to be connected with a queue named one to the queue of some other module.
The routingtable section of the bootstrap file (line 18) determines that the input module has its default queue outbox connected to another module called decode.
Decoding JSON
Internally, Wishbone treats data as a Python data structure, therefor the incoming data has to be converted to a Python datastructure so downstream modules can work with it.
More importantly, it also ensures that incoming data is valid JSON. If that's not the case, the event is automatically submitted to the module's failed queue from which further action can be taken (line 26) by connecting another module to it if desired. In this example we print all invalid JSON data to STDOUT in red (line 12).
Validating JSON data
JSON Schema describes how JSON data must be structured. In this case we will use it to validate the client-submitted data.
The JSON schema we will be using as an example is:
1 2 3 4 5 6 7 8 9 10 11 12 13 14 15 16 17 18 19 20 21 22 23 24 25 26 | { "type": "object", "properties": { "greeting": { "enum": [ "Good morning", "Good afternoon", "Good evening", "Good night" ], "type": "string" }, "name": { "type": "string" }, "title": { "type": "string" } }, "additionalProperties": false, "required": [ "greeting", "title", "name" ] } |
The validation schema is stored in /tmp/webhook_validation_schema.json as defined in our bootstrap file (line 18).
When the incoming JSON data passes the validation it will be submitted to the module's outbox queue. When the JSON data fails to validate against the schema it is submitted to the failed queue.
In our example validated JSON data will be printed to STDOUT in green (line 33) whilst invalid JSON data will be printed to STDOUT in yellow (line 34).
Running some tests
Submitting invalid JSON data
$ echo 'abc'|curl -v -H "Content-type: application/json" -X POST -d @- "http://localhost:19283";echo
Results into following output:
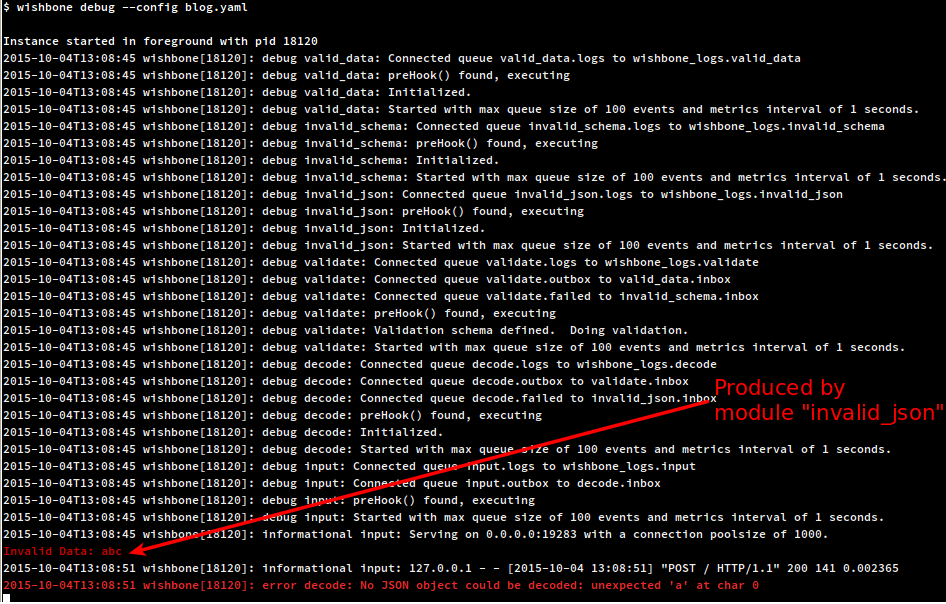
The string 'abc' does not get passed module decode and is therefor submitted via its failed queue to the invalid_json module which prints incoming data to STDOUT in red color.
Valid JSON not passing JSON-schema validation
$ echo '{"greeting":"Hi", "title": "King", "name": "Thistle"}'|curl -v -H "Content-type: application/json" -X POST -d @- "http://localhost:19283"
Results into following output:

Although the input is valid JSON, it does not get passed the validate module and is therefor submitted via its failed queue to the invalid_schema module which prints incoming data to STDOUT in yellow color.
The schema defines that the allowed values for "greeting" may not contain the value "Hi" (line 5).
Valid JSON passing JSON-schema validation
$ echo '{"greeting":"Good morning", "title": "King", "name": "Thistle"}'|curl -v -H "Content-type: application/json" -X POST -d @- "http://localhost:19283";echo
Results into following output:

The submitted data is valid JSON and successfully passed the schema validation and is therefor submitted to the valid_data module which prints incoming data to STDOUT in green color.
Final words
Although it has its practical use cases like manually validating JSON, this setup is just an example. It tries to give the reader an insight on how the Wishbone system is layed out and how it can be applied to accept and process JSON data submitted via webhooks.
In a next blogpost we will explore how we can further process the webhook data with custom code.