I would like to have a notification system on my phone and laptop to receive messages from various service events in order to keep track of events which require my attention.
So why not use Twitter and Wishbone to create a Twitter bot which does exactly what I need?
Abstract
In this series of articles we will build a Twitter notification system for webhook events coming from various services such as Travis, Github and Docker hub, etc ...
This first article covers the setup and configuration of Wishbone so we have a foundation which we will extend in the follow up articles.
The examples shown are merely a guideline so the reader probably should adapt the setup to their own taste and requirements.
Prerequisites
- Some basic knowledge of
Dockerwould be useful since all examples are based on that. Whilst that (for me) simplifies running Wishbone, it perhaps might not be what you prefer. If you want to, you can install Wishbone and its modules directly in your OS without much effort. - Have a Twitter account to broadcast the messages. You can either create a (private) dedicated bot account or tweet from your own name. Whatever works best in your case.
- Under your newly created bot account, create a Twitter application in
https://apps.twitter.com/ and obtain the
Consumer Key,Consumer Secret,Access TokenandAccess Token Secretwhich are required to allow wishbone to authenticate to the Twitter API and send tweets. - Having read https://smetj.net/an_introduction_to_the_wishbone-input-httpserver_module.html could be useful since we will be using this module extensively.
Wishbone Setup
We will use the latest version of following components:
- https://github.com/smetj/wishbone
- https://github.com/wishbone-modules/wishbone-input-httpserver
- https://github.com/wishbone-modules/wishbone-output-twitter
The following Docker container image contains all the required modules:
Or you can just use smetj/twitter_notifier:latest directly.
Running a first bot
The following Wishbone bootstrap file will start the base bot server on which we can start to add the services we wish to implement:
Obviously you will have to complete the Twitter configuration using the correct values.
Running the server
$ docker run -t -i --rm --privileged -p 19283:19283 -v $(pwd)/bootstrap.yaml:/bootstrap.yaml \
    smetj/twitter_notifier:latest start --config /bootstrap.yaml
Instance started in foreground with pid 31370
2018-04-02T12:20:37.6923+00:00 wishbone[31370] informational incoming_webhooks: Webserver bound to 0.0.0.0:19283. Listening for incoming requests
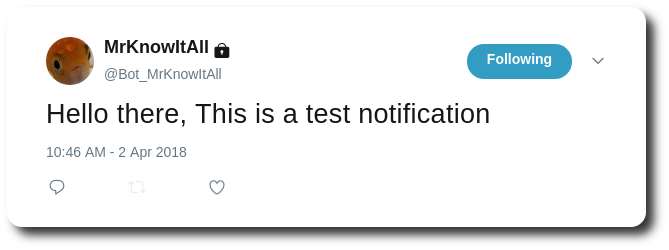
Sending a message
$ echo '{"payload":"This is a test notification"}'|curl -XPUT -u test_user -d @- http://localhost:19283/test
Enter host password for user 'test_user':
OK b80825d4-dbe0-4bcc-9c5d-626dddc06107
Result
Finishing thoughts
This will form the base for further integrations. The next step for you is to deploy the Wishbone server so it can be reached from the internet. How to do that depends on your infrastructure and is beyond the scope of this article.
If you do so, make sure you
enable SSL- enforce
authenticationon your endpoints.
Conclusion
We have covered how to setup a Wishbone server which accepts JSON webhook data and creates a Tweet build out of the submitted payload.
In the next article we will cover how to accept Travis CI webhooks and create the notifications we like to see.
The notification system described in this article will be referred to as the base notification system in the follow-up articles.
If you have any questions, suggestions, recommendations or any feedback feel free to get in touch.