When I first came in touch with the messaging concept it was some kind of a revelation. Ever since many solutions I work on involve message brokers one way or the other. Because of that, a design pattern occurred hence the need for a Python framework allowing me to easily write solutions to interact with messaging based setups. Wishbone is a Python framework which simplifies writing coroutine event pipelines. Wishbone is a framework in which you can load and connect multiple modules in order to come to a tailored solution. Although Wishbone's scope is larger than that, I would like to demonstrate how easy it is to write a daemon which consumes and processes messages from `RabbitMQ`_.
Preparation
If you want to be able to execute the examples throughout this article you should have a RabbitMQ (with the management plugin) instance up and running and install the Wishbone library. There is some great RabbitMQ documentation out there explaining you how to install a basic stand-alone instance.
Installing Wishbone
Installing the Wishbone library can be done through Cheeseshop or from GitHub:
[vagrant@wishbone ~]$ sudo easy_install wishbone
On centos I required: gcc-c++ snappy-devel python-dev Cython libev-devel
RabbitMQ
Within RabbitMQ let's create 2 queues we're going to use in this article
Visit the web based RabbitMQ management application listening on port 55672 and create 3 queues:
wishbone_in, wishbone_even, wishbone_uneven
RabbitMQ Management Interface
- You can achieve the same by using the rabbitmqadmin tool.
Creating a Wishbone Setup
Now we have our test environment up and running lets create our first daemon.
Challenge
Create a daemon which consumes messages from the wishbone_in queue. Each submitted message contains an integer. If this integer is even we submit the message to the wishbone_uneven queue while the messages with even values should end up in the wishbone_even queue.
Make a server
Wishbone is made to easily write daemons. It comes with the required functionality to minimize all the work which goes along with that:
#!/usr/bin/env python
from wishbone.server import BootStrap
if __name__ == '__main__':
    BootStrap(name="BrokerTest",
        description="This setup is just an example.",
        version="0.1",
        author="Your name"
    )
Save the content to a file called "brokertest" and make it executable. When executing you will get:

And that's it! You have a WishBone server available. Granted it doesn't do anything at all at this stage but that's what we'll cover in the next paragraph.
Modules
Wishbone has the concept of modules. A module is a piece of code which is plugged into the Wishbone framework which takes data in and pushes data out. Our WishBone server needs to know which modules to load, how to initialize them and how to tie them together into a workflow. This is done using a bootstrap file which is loaded using the --config option. A bootstrap file is mandatory, otherwise your Wishbone application is just an empty shell.
Use an existing module: Broker
Wishbone comes with a bunch of already available modules. One of them is the Broker module which allows you to get RabbitMQ messages in and out of Wishbone.
We are going to initialize the broker module with following parameters:
... snip ...
"broker":{
         "module":"wishbone.iomodules.broker",
         "class":"Broker",
         "variables":{
            "host":"sandbox",
            "vhost":"/",
            "username":"guest",
            "password":"guest",
            "consume_queue":"wishbone_in",
            "prefetch_count":200,
            "no_ack":false,
            "delivery_mode":2
         }
}
... snip ...
Most of the parameters speak for themselves. Have a look at the module documentation page for details.
Create a new module: EvenUneven
A module to determine whether the number is even/uneven is of course not available out of the box. We're going to create this one ourselves.
WishBone includes a skeleton module which can be used as a standard to build your new module on.
The WishBone framework really requires a Python module to load. That means you should create a directory called "evenuneven" and paste the below code into a file called evenuneven/__init__.py
Wishbone modules are actually regular Python modules. You should really try to follow the proper guidelines on how to build, package and install Python modules.
#!/usr/bin/env python

from wishbone.toolkit import PrimitiveActor

class EvenUneven(PrimitiveActor):
    '''**An example Wishbone module which verifies if the data submitted
    is even or uneven.**''

    Parameters:

        - name (str):    The instance name when initiated.

    Queues:

        - inbox:    Incoming events.
        - outbox:   Outgoing events.
    '''

    def __init__(self, name):
        PrimitiveActor.__init__(self, name)

    def consume(self,doc):
        if int(doc["data"])%2 == 0:
            self.logging.info('I received an even message.')

            doc["header"]["broker_exchange"]=''
            doc["header"]["broker_key"]='wishbone_even'
        else:
            self.logging.info('I received an uneven message.')

            doc["header"]["broker_exchange"]=''
            doc["header"]["broker_key"]='wishbone_uneven'

        self.putData(doc)

    def shutdown(self):
        self.logging.info('Shutdown')
Once initiated, this class will run as a (green)thread within the Wishbone framework. The initialized instance of the class will automatically "inherit" an inbox and outbox queue. All messages arriving to the inbox queue will automatically be "consumed" by the consume() function. The framework will do that for you, so you don't need to worry about that. Once done processing the data it can be place into the class's outbox queue, which is done using the putData() function (line 34).
Each document flowing through the framework has following format:
{"header":{}, "data":object }
We're extending the "header" part of the document with 2 variables: "broker_exchange" and "broker_key". When this message will arrive back into the broker module it will know to which exchange and queue to submit the document to.
This simple module does not require any variables when initialized, so the bootstrap file section to initialize this module would look like:
... snip ...
"evenuneven":{
         "module":"evenuneven",
         "class":"EvenUneven",
         "variables":{
         }
}
... snip ...
Bootstrap file
The bootstrap file (which is defined through the --config option) tells the WishBone server which modules to load and how the data flows through the modules.
The complete bootstrap for our example setup would look like this:
{
   "system":{
      "metrics":true,
      "metrics_interval":10,
      "metrics_dst":"logging"
   },
   "bootstrap":{
      "broker":{
         "module":"wishbone.iomodules.broker",
         "class":"Broker",
         "variables":{
            "host":"sandbox",
            "vhost":"/",
            "username":"guest",
            "password":"guest",
            "consume_queue":"wishbone_in",
            "prefetch_count":200,
            "no_ack":true,
            "delivery_mode":2
         }
      },
      "evenuneven":{
         "module":"evenuneven",
         "class":"EvenUneven",
         "variables":{
         }
      }
   },
   "routingtable":{
      "broker.inbox":[
         "evenuneven.inbox"
      ],
      "evenuneven.outbox":[
         "broker.outbox"
      ]
   }
}
The system section of the bootstrap file allows you to control Wishbone framework specific items. Currently only options related to metrics are available.
The bootstrap section allows you to initialize the modules and assign them to an instance name, which is in this case "broker" and "evenuneven".
The routingtable section allows you to connect the instance queues to each other in order to determine the application's dataflow. Normally one connects the outbox queue to the inbox queue. But in case of an IOmodule (which the broker module is) the data coming from the outside world arrives inbox queue and the data going to the outside world should go to the outbox queue.
Start your server and test.
To start your server and prevent it to fork into the background you should do something like:
[vagrant@wishbone files]$ ./brokertest debug --config brokertest.json --loglevel debug
You should get a similar output to following screenshot:

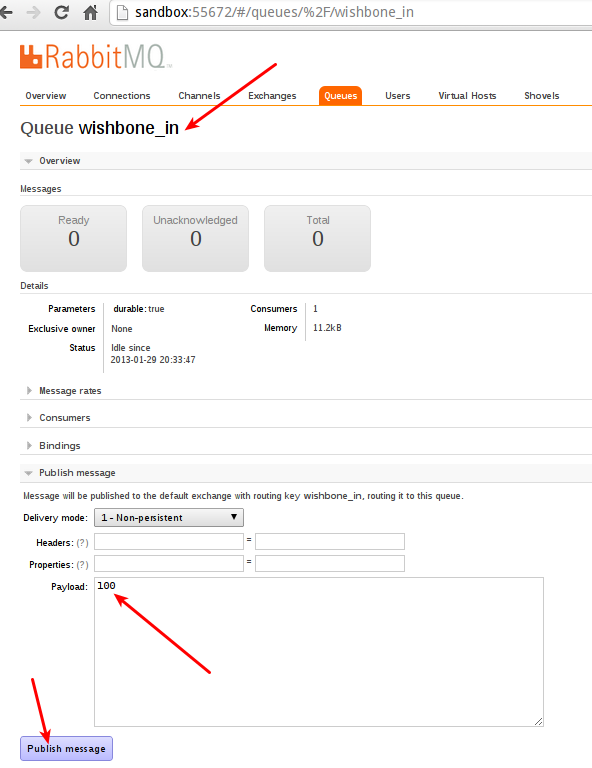
Now submit a message containing the number "100" through the RabbitMQ broker management interface into the wishbone_in queue.
If all went well your Wishbone application should create a log entry about the data you just submitted:

Have a look to the wishbone_even queue your message should be arrived there.
Conclusion
Although the the example as such isn't that spectacular and it only scratches the surface of the possibilities it hopefully shows you how easy it is to create a Python based server which interacts with RabbitMQ. The Wishbone library also includes other IO modules. Have a look at my experiments repository for more examples of Wishbone setups.