
Travis CI is a hosted, distributed continuous integration service used to build and test software projects hosted at GitHub. Travis CI can notify you about your build results through email, IRC, chat or custom webhooks.
In this article we will cover how to integrate the Travis custom webhooks into the Wishbone based notification system we have built and configured in the first article of this series.
Abstract
In this article we will expand the base notification system to convert the Travis notifications into tweets so we can keep track of interesting events which require our attention like failing builds.
Furthermore we will focus on how to safely store the webhook API credentials in the Travis configuration and how to compose the Tweet messages using the available webhook properties.
Prerequisites
- Have the base notification system up and running as explained in the first article of this series.
- Your Wishbone notification system is available over the internet and should
have
SSLandauthenticationenabled. You can either do ssl- offloading with some reverse proxy such as traefik or let Wishbone itself handle SSL. - Familiarize yourself with the
wishbone.module.flow.queueselectmodule. - Have at least one Github repository added to your Travis account.
Configuring Travis notifications
Details see: https://docs.travis-ci.com/user/notifications/#Configuring-webhook-notifications
Activating webhooks is done by adding a similar configuration to the
.travis.yml file located in the root of your Git managed project:
notifications:
  webhooks:
    urls:
      - https://username:password@wishbone.mydomain.com/travis
    on_success: change
    on_failure: always
    on_start: change
    on_cancel: always
    on_error: always
Encrypting username and password
Details see: https://docs.travis-ci.com/user/encryption-keys
Obviously, storing the API credentials as clear text in .travis.yml
for everybody to read isn't a good idea.
One option could have been to store the password as a hidden environment
variable and use that variable in the URI but that's not supported. Long
story short, environment variables are simply not available to the notifications
section of .travis.yml. 1
Luckily Travis allows you to define encrypted values using your project's public key. The encrypted value can only be decrypted by the Travis build system since it has access to the project's private key.
Using the Travis CLI you can issue following command:
$ travis encrypt -r wishbone-modules/wishbone-output-twitter
Reading from stdin, press Ctrl+D when done
https://username:password@wishbone.mydomain.com/travis
Please add the following to your .travis.yml file:

  secure: "abcdefghijklmnopqrstuvwxyz"
You can now replace the cleartext URL with the complete returned value,
including the secure: prefix 2:
notifications:
  webhooks:
    urls:
      - secure: "abcdefghijklmnopqrstuvwxyz"
    on_success: change
    on_failure: always
    on_start: change
    on_cancel: always
    on_error: always
Wishbone Setup
The Wishbone bootstrap file has to be extended so we can accept the incoming data, compose the proper message and send it out.
Let's consider following example bootstrap file:
Adding the /travis endpoint
Giving each service a dedicated endpoint simplifies things. It's clean, it allows you to restrict access using dedicated credentials and it already categorizes incoming data.
In order to add the /travis endpoint we need to define another resource in the
incoming_webhooks instance. (see line 15):
"^travis$":
  users:
    - travis
  tokens: []
  response: "OK {{uuid}}"
  urldecoded_field: payload
The key ^travis$ is a regex matching the endpoint we'd like to
configure. Users is an array of the usernames allowed access to the
endpoint.
Tokens is left empty as we cannot use it since Travis webhook
:notifications do not support that.
The response parameter composes the response going to the client which
is in this context not that useful.
The Travis webhooks are delivered with a application/x-www-form-
urlencoded content type using HTTP POST, with the body including a payload
parameter that contains the JSON webhook payload in a URL-encoded format.
By setting the urldecoded_field to payload we instruct Wishbone to
expect the incoming data has to be URL-decoded and the parameter of interest
is payload. Once the value is acquired, it is send to the defined
protocol decoder (line 12) for further processing.
The htpasswd field (line 21) should contain a htpasswd encoded
password for user travis. This will be the password the Travis webhook
should use to authenticate to this endpoint.
There is one last thing to do in order to actually create the endpoint. The
wishbone_contrib.module.input.httpserver module maps endpoints to queues.
When connecting incoming_webhooks.travis to funnel.travis in
the routing table section (line 55), the behavior of the module is such that
it creates an endpoint using the same name and maps it to that to a new queue.
Any payloads successfully submitted to that endpoint end up in the
corresponding queue from which it can flow to other module for further
processing.
Composing the tweet
To compose a tweet and cherry-pick content from the Travis payload we are
going to use the builtin wishbone.module.flow.queueselect module.
The main purpose of this module is to route events to certain queues based on the content of the payload along with an optional, payload.
We'll add an entry to the template key (line 32) with following
content:
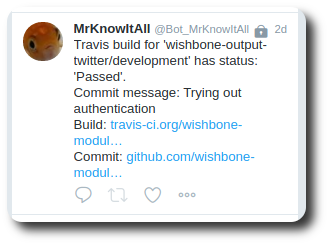
- name: "Travis Build"
  queue: "{{ 'outbox' if tmp.input.env.path_info == '/travis' }}"
  payload: >
    Travis build for '{{data.repository.name}}/{{data.branch}}' has status: '{{data.status_message}}'.

    Commit message: {{data.message}}

    Build: {{data.build_url}}

    Commit: {{data.compare_url}}

    #build #travis
The queue value is Jinja2 template which once rendered will have value
outbox. This means the event will be forwarded to the outbox queue.
The payload template is used to compose the tweet cherry-picking data
from the Travis payload.
An example Payload can be found here: https://docs.travis-ci.com/user/notifications/#Webhooks-Delivery-Format
By default, the result of the rendered template is stored in the event's
tmp.payload.payload key from where it can be used by the
twitter module instance to send out the tweet.
Conclusion
In this article we have covered how to store encrypted credentials in the Travis configuration, how to let Travis CI webhooks authenticate against the Wishbone endpoint and how to compose and send a tweet from the incoming webhook payload.
If you have any questions, suggestions or feedback don't hesitate to drop me a line.
Footnotes
- https://github.com/travis-ci/travis-ci/issues/9407 ↩
- The encrypted value provided in this example is obviously a fake value. When excuting the Travis CLI tool you will receive a properly encrypted value ↩