Dropbox is a file hosting service operated by American company Dropbox, Inc., headquartered in San Francisco, California, that offers cloud storage, file synchronization, personal cloud, and client software.
In this article we will cover how to integrate Dropbox webhooks into the Wishbone based notification system we have built and configured in the first article of this series.
Abstract

Dropbox can be configured to trigger webhooks the moment the content of a particular directory changes. In this article we will cover how to register and configure a Dropbox application to send webhooks to Wishbone.
We will be extending the base notification server to receive the Dropbox webhooks and trigger a notification. We will also configure additional instrumentation to Wishbone to make sure we don't send excessive, duplicate notifications when changing many files at once.
Prerequisites
- Have the base notification system up and running as explained in the first article of this series.
- Your Wishbone notification system is available over the internet and should
have
SSLandauthenticationenabled. You can either do ssl- offloading with some reverse proxy such as traefik or let Wishbone itself handle SSL. - Familiarize yourself with the
wishbone.module.flow.queueselectmodule. - Have a Dropbox account
Configure Wishbone
Consider following bootstrap file:
Adding the /dropbox endpoint
"^dropbox$":
  users:
    - dropbox
  tokens: []
  response: "{{tmp.incoming_webhooks.params.challenge}}"
  urldecoded_field: null
Extract from Dropbox webhook docs:
The verification request will be a GET request with a challenge parameter, which is a random string (e.g. https://www.example.com/dropbox- webhook?challenge=abc123). Your app should echo back the challenge parameter as the body of its response. Once Dropbox receives a valid response, the endpoint is considered to be a valid webhook, and Dropbox will begin sending notifications of file changes. Your app has up to ten seconds to respond to the verification request. Dropbox will not perform automatic retry for verification requests.
The configuration for the /dropbox is pretty basic and the same
as what was done in the previous articles except for the response. Any
parameters passed to Wishbone are stored the
tmp.incoming_webhooks.params hence we can refer to it when
defining the reply in order to satisfy the initial validation step. Once the
validation has passed, it serves no further purpose so you can change it again
to some other value.
Composing the message to tweet
The incoming Dropbox webhook payload is a bit disappointing in terms of content:
{
    "delta": {
        "users": [
            99999999
        ]
    },
    "list_folder": {
        "accounts": [
            "dbid:abcdefghijklmnopqrstuvwxyz-123455"
        ]
    }
}
From the Dropbox docs:
Note that only the user IDs and accounts with file changes are provided. Your app is expected to call /files/list_folder/continue to find out what files changed using the latest cursor your app previously stored for that account. If your app is still using v1, you can call /delta
So this won't tell us much what has changed but it least we know something has. In a follow up article we will cover how to use this payload to extract more detailed information from the Dropbox API to construct an even more informative message. 1
To compose the content of the tweet we need to be a bit creative because of the fact Twitter refuses to send duplicate messages, hence we need to make our message content change for each notification:
To achieve this, we add a timestamp to each notification:
payload:
  module: wishbone.module.flow.queueselect
  arguments:
    templates:
      - name: "Website smetj.net updated"
        queue: "{{ 'outbox' if tmp.incoming_webhooks.env.path_info == '/dropbox' }}"
        payload: >
          {{strftime(epoch(), "YYYY-MM-DD HH:mm:ss ZZ")}}: Website https://smetj.net has been updated.
          #website #smetj.net
Limit notifications
If you change many files at once, Dropbox can execute more than one webhook call resulting into multiple notifications being sent. This we can prevent by using the wishbone.module.flow.count which can limit the number of events passing through within a certain time window. 2
uniq:
    module: wishbone.module.flow.count
    arguments:
      conditions:
        data:
          value:
            list_folder:
              accounts:
                - "dbid:abcdefghijklmnopqrstuvwxyz-123455"
            delta:
              users:
                - 99999999
          occurrence: 2
          window: 60
          action: drop
This configuration defines we inspect on the contents of the data field.
Configuring Dropbox
Step 1
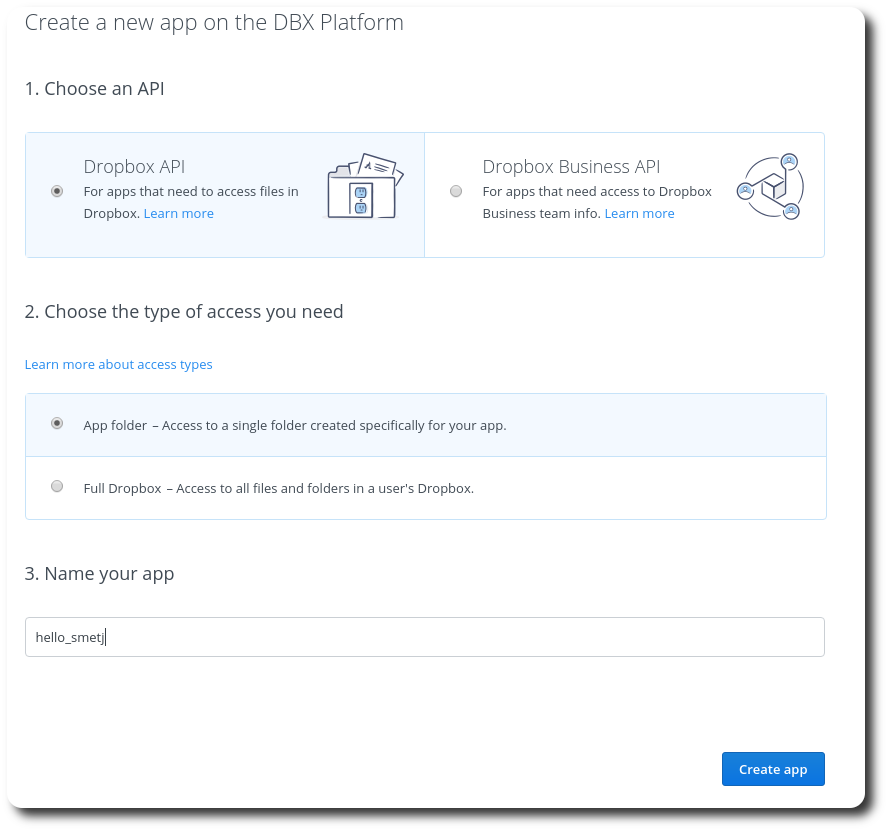
Go visit https://www.dropbox.com/developers/apps and click on the
Create app button.
Select access type App folder and choose a unique name in step 3 then
click the create app button.

Step 2
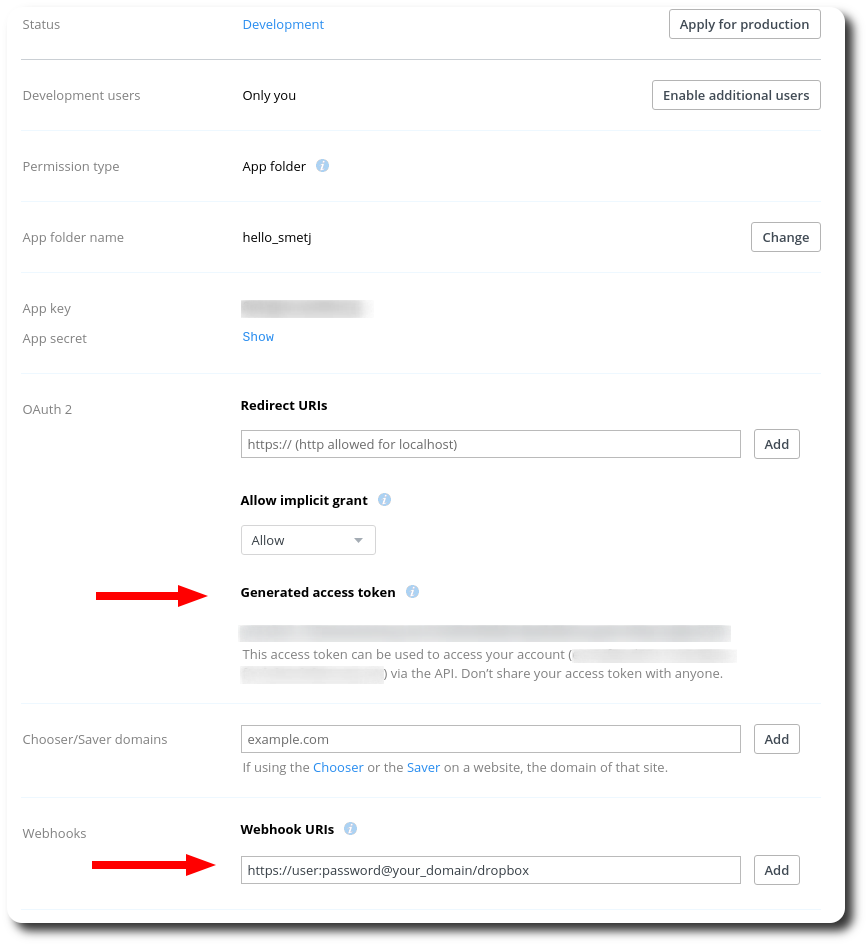
Click on the Generate access token button. At this stage Dropbox
will have automatically created an Apps/hello_smetj folder.
Then add your webhook address on which Wishbone is listening including the defined username and password in the URI:
As explained previously, Dropbox will first do a verification request. Once
passed you can change the response for the /dropbox to something
which make more sense.

Conclusion
In this article we have covered how to configure and combine Wishbone and Dropbox webhooks to send custom notifications when the content of a directory has changed.
Feedback welcome.